Photo & Packing Consultations
We’re happy to support your travel preparation!
If You’re Joining One of Our Trips
When you’re signed up for one of our trips, a reasonable amount of photo consultation is included for free. We’re glad to help you get camera-ready—whether that means advising on gear, image storage, or trip-specific needs.
Planning Other Travels?
We also offer paid consultation by the hour if you’d like help packing or prepping for a trip with another travel provider. From gear selection to photography logistics, we’re available to support your travel plans.
To inquire about rates and availability, please email us directly at info@cherylopperman.com.
A Note on Requirements
While we’re happy to share our expertise, we recommend that you always consult your own travel provider for their specific requirements. We can only be sure of details for the trips we operate.
Packing Information for Your Antarctica Photography Trip
Below, you’ll find suggested items to pack for your Antarctica photography trip, along with helpful tips to guide your choices. Use this list to compare against what you already own, and if there’s anything you need to pick up, convenient links are provided.
Some of these links are affiliate or dealer links, which means that in certain cases, we may earn a small commission if you make a purchase—at no additional cost to you.
For select items, we are also an authorized dealer and can often match or beat advertised prices. If you’re interested in any of these products, feel free to get in touch directly for pricing and availability.
Some companies also offer coupon codes or special gifts that are listed near their link.
Any special offers or coupon codes are typed in RED.
To use our Amazon affiliate links, you may sign up for a trial membership if you are not already a member. With two day shipping, you have plenty of time to get anything else you need for the trip.
Prime also comes with their video streaming service that we use all the time at home. Some purchased videos can also be downloaded to your device so you can watch them offline while traveling. We try to pick out a couple movies to take along in case we get stuck at the airport longer than expected.
Your support of our small business is sincerely appreciated. Please feel free to email us at info@cherylopperman.com if a link does not work or you have a suggestion to add to the page.
Airline Baggage Size & Weight Restrictions
As you pack for your trip, please keep in mind the baggage policy of all the airlines you will use during your trip. Each airline’s baggage size and weight restrictions can be found on their website, but here are a few guidelines for common airline carriers to Antarctica:
United Airlines
Carry-on Bag (for the overhead bin): 9” x 14” x 22” (including handles & wheels) No defined weight limit
Personal Item (for under the seat): 9” x 10” x 17” No defined weight limit
Checked Baggage: 62 inches total (length + width + height) 50lbs maximum
Latam Airlines Group
Carry-on Bag (for the overhead bin): 10” x 14” x 22” (including handles & wheels) 22lbs maximum
Personal Item (for under the seat): 8” x 14” x 18” No defined weight limit
Checked Baggage: 62 inches total (length + width + height) 50lbs maximum
Camera Equipment
I use Canon camera gear and will list links to the gear I take to Antarctica below. You can use them as a guide to compare to gear you already own.
Camera Bodies
When going such a long distance, I always recommend taking at least two camera bodies. If you don’t have two, consider buying a used camera as your backup. There is nothing worse than having your only camera body break down on the trip of a lifetime! (If you need a backup Canon body, I have a couple used bodies I am selling, so feel free to email me for more info at info@cherylopperman.com)
If you are considering the purchase of a new Canon camera for the Antarctica photography trip, I highly recommend the Canon R5 Mark II. It is a full frame mirrorless camera with excellent image quality and very useful features. I can still use all of my EF lenses by purchasing an adapter. In fact, I almost prefer the EF lenses as I can use an adapter with a drop in filter that makes it easy to change filters quickly in the field. My filter recommendations are listed below in a separate section.
Lenses
Every trip is different, so these are the lens ranges that I use most often on the trip.
The lenses I take to Antarctica:
- Canon EF 200-400mm f/4 with built in 1.4 teleconverter
- Canon EF 24-70mm f/2.8 or Canon EF 24-105mm f/4
- Canon EF 70-200 f/2.8
- Canon 1.4x Tele Extender
- Canon EF 8-15mm f/4 Fisheye
RF Lenses worth considering in place of the lenses above:
- Canon RF 100-500mm f/4.5-7.1
- Canon RF 24-70mm f/2.8 or Canon RF 24-105mm f/2.8 or Canon RF 24-105mm f/4
- Canon RF 70-200mm f/2.8
- Canon RF 1.4x Tele Extender
Third Party Lens available for Canon, Sony, and Nikon:
- Tamron 150-600mm f/5-6.3 Both are much less expensive with an excellent range
- Sigma 150-600mm f/5-6.3
Batteries, Extra Caps, and Accessories
Be sure you take extra lens and body caps and extra camera batteries. Batteries generally do not perform well in the cold, so if you can keep an extra set inside a warm jacket pocket, you will be able to switch them out quickly. I usually take three sets of camera batteries per camera body. If you have Canon or Nikon Cameras, I’ve also found a really nice case to use for carrying my extra batteries along with my memory cards. It can hold 4 SD Cards and 2 CF or CFExpress Cards. I then put even more batteries in these soft battery holders.
It’s also important to use a camera strap when you are hand holding from the ship or zodiac. I prefer binoculars straps as they help take the weight of the camera off my shoulders. If you don’t want a strap that stretches like the binocular straps do, this solid strap in the same style works just as well and perhaps better with a heavier camera and lens.
When using a tripod for landscapes, a cable release can be very helpful to ensure camera vibrations don’t impact image quality. In these cases, it is important to remember to turn OFF your image stabilization.
Small binoculars are optional, but may allow you to help us spot wildlife in the distance.
CAMERA Rain Covers
We will very likely have some rain and/or snow on the trip, so it is important to protect your camera gear. I use very inexpensive Camera Rain Covers that are lightweight and compact, but can be used over and over again. You can purchase something fancier, but these do the job and take up a lot less space. They come in small, original, and Mega sizes, so a mix of sizes is a good idea. The original size will work well for most lenses. The Mega is really for super telephoto lenses such as the 600mm f/4. They also make a version that will cover a midrange lens on a camera with a flash.
ThinkTank™ makes some good rain covers that can be found under the accessories tab on their website if you want to invest in something a little longer lasting.
One of the best options for a camera hanging around your neck instead of inside a camera bag is to use a large stuff sack. Be sure to get one that is large enough to easily fit over your lens and camera body. I buy several for each lens/body combination. The 20 liter works well for a 100-400mm. When I’m just walking around or if it is just misting slightly, I slip the bag over the lens and camera (while wearing the neck strap or binocular harness) and cinch it down tight until I’m ready to photograph. It’s fast, easy, and lightweight to pack.
It’s also a good idea to have rain gear or a good poncho to keep yourself dry!
Filters
There are two types of filters I never travel without. A polarizer and neutral density. Both are available as magnetic filters for the front of the lens or as a drop in filter for lenses or adapters that have that option.
Here are links for magnetic front filters and drop in filters for Canon cameras. If you have filter questions, please just give me a call at (303) 829-9453 or email me at info@cherylopperman.com. There are a lot of options, so it’s best to make sure you are ordering the correct filters for your needs.
A polarizer is good for eliminating reflections, darkening the blue sky (at certain angles to the sun), and enhancing the colors of rainbows.
Neutral density allows you to slow down the shutter speed for creative motion blur effects with waves, waterfalls, penguins, and clouds. If you shoot with a mirrorless camera, you can create a magnetic variable neutral density with two linear polarizers which works extremely well as it is easily adjustable to block out just the right amount of light.
Camera Bags
ThinkTank™
ThinkTank™ makes my favorite backpacks for Antarctica – the Backlight™. There are 3 styles from which to choose based on how much gear you will carry. My favorite for a lot of gear is the Elite 45L, but for a smaller mirrorless system or not as much gear, that may be bigger than you want. The 26L version is a great size for this trip and still holds a lot of gear.
What makes these bags so perfect is that they open from the back, so you never have to set them on the ground. If you do want to set the bag on the ground, there is an included rain cover which fits over the pack and can easily be rinsed off when you get back to the ship.
If you prefer to pack your backpack and use a roller bag through the airport, they also make great international sized roller bags. I personally like the Airport Advantage XT bag for larger items or the Airport Advantage for a smaller amount of gear.
When using the Elite 45L, I prefer to take out the padded insert and put the backpack shell in my checked luggage. I can then put the padded insert with all of my gear into a regular carry on roller bag. Normally, this combination will fit in the overhead bin of the plane, but if it does not, I can use the emergency straps on the padded insert to carry it as a backpack (which will fit in the overhead bin without a problem) and gate check the outer roller bag. If you are looking for a roller bag that will fit this insert and comply with most airline dimensions, I found one that works well on Amazon: 20″ Roller Bag that fits the Elite 45L Insert. This roller bag will also fit around the 26L Backlight™ (by stuffing the waist straps to the side) if you want a way to roll it through the airport.
I’m a ThinkTank™ affiliate, so you get a free gift if you order through my link.

Wandrd™
Wandrd™ also makes great bags and their PRVKE 15L is the bag I like to use as my personal item. It is the under the seat bag I use for ALL of my international trips now as it adheres to most airlines’ size limitations (be sure to check your airline for weight restrictions as well).
It’s also a great small camera backpack that can be used in the field. It does not fit mirrorless bodies with a battery grip or a DSLR very well, but it is perfect for the Canon R5 without the battery grip. I usually carry my back-up Canon R5 (without the grip) attached to the 100-400mm lens and my 24-70mm lens in this bag. I can also fit a couple of additional small lenses in the upper compartment, but it does not have padding in that section, so those lenses need to be protected in a protective wrap. It’s also helpful to buy the WAIST STRAPS for more support.
Wandrd™ also makes handy accessories.
I am an affiliate for Wandrd™ and they have great sales on some holidays.
FishPond
I just discovered this company, and their submersible bags are a great waterproof option for quick access to smaller camera gear in the zodiac. It is very helpful to have a smaller waterproof bag that allows quick access to your camera. I will be using the Thunderhead Lumbar bag myself on this trip. It comfortably fits my camera body (without the battery grip) with the 70-200mm lens attached. I think it will be a bag I use often in Alaska as well when crossing rivers. Be sure to order the padded insert to help provide padding for the camera gear.
They also have a submursable backpack that would work well for smaller lenses. It’s not going to fit big prime lenses, but would be a better option than the lumbar pack to carry something like a smaller 100-400mm with a camera body and even an extra wide angle lens.
I’m also taking their Micro Trash Container as a place to store small trash items, such as used tissues. There can be wind when we are onshore and if you have a runny nose in the cold (like I do), this gives you a fast and easy option for storage so the tissues don’t blow around and litter the landscape. I usually take several of these and attach them to the zipper pulls of my jackets and camera bags so one is always handy. If you want something a bit larger, this mini expandable trash container works well too.
Other Waterproof Options
If you are only taking one camera body and lens ashore, this roll top waterproof bag would also be a good option. It does not have any padding, but you could wrap your camera and lens in a towel or extra jacket and it would work well with less bulk that the other options.
Sea to Summit
Sea to Summit makes a lot of great gear and is what I choose for my roll top waterproof backpack. It is a necessity to have some sort of Dry-Pack that will fit over your camera bag when we make landings in the zodiacs (unless you are just going to use a submersible backpack as described above). Just be sure you order one big enough to fit OVER your camera bag. I take the 75L pack for my larger backpack the Backlight Elite 45L.
Tripods & Tripod Heads
I do take a tripod on every trip! If you don’t already have a good one, some suggestions are below.
Really Right Stuff Tripods
There are a lot of tripod options on the market, but my favorite brand by far is Really Right Stuff. It is well worth the extra money to buy a good tripod. Unlike cameras, a good tripod will last your entire photographic career. If you buy cheap tripods, you will likely end up having to continually upgrade. One of my clients had a great quote: “Buy a good tripod and cry once, or buy cheap tripods and cry many times.”
I’ll provide links below to the Really Right Stuff tripods I use. (I do NOT earn commissions on links to the Really Right Stuff website, so they are provided for your convenience. Sometimes their gear is available on Amazon, where I will earn an affiliate comission)
I always suggest choosing the “long” version. A tall tripod allows you to extend one leg down a hill so that you can keep the overall height at eye level (the most comfortable position for tracking wildlife or birds in flight). I also suggest you avoid center columns. Raising a center column for additional height severely reduces your stability and also gets in the way when you want to use your tripod at ground level.
It’s also game changing to add a leveling base to your tripod if you will be using gimbal style heads (discussed below). Leveling bases ensure faster set up as you no longer have to painstakingly adjust each leg to make the tripod level (for straight horizon lines). You can ball park the leg heights and then make one final adjustment with the leveling base to ensure the tripod head is level to the ground. The leveling base for each tripod type is listed below.
For really heavy lenses, I recommend the Series 3 Tripod with the Integrated Leveling Base.
For lighter lenses, the Series 2 Tripod will be more than sufficient with the Universal Leveling Base (Platform with Stud Version).
If you want the very lightest tripod for hiking, the Ascend 14L Tripod is a great choice.
Leofoto
I also recently became a dealer for Leofoto. They make good tripods and accessories that are an excellent option if you can’t afford RRS. I can order any of their products for you, so please just email or call with the item number. I can also offer a special discount on most of their products to my clients.
Monopod
It’s also nice to have a monopod to use from the larger ship decks.
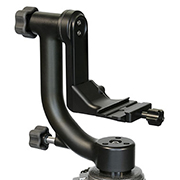
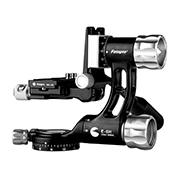
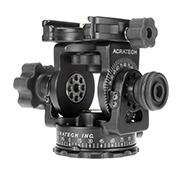
Gimbal Style Tripod Heads
For wildlife photography, and especially when tracking birds in flight, a gimbal style head is the best choice. In fact, I use gimbal heads for all of my landscapes as well. They make composing and stitching multiple frames extremely easy.
If you are going to use a short lens that does not have a tripod collar on the gimbal style head, you will need a plate so that you can attach the camera facing forward. I like this Plate made by Really Right Stuff.
All the tripod heads I use fit Arca Swiss style plates. I sell plates for lenses, but recommend L-style plates made by Really Right Stuff for your camera body.
These are the only 3 tripod heads I use:
For larger and heavier lenses, the Wimberley Head is the best choice. I am a dealer for Wimberley, so please contact me at 303-829-9453 or info@cherylopperman.com if you would like to order. $595.00 Wimberley also makes a sidekick option for $250.00 (that turns your ball head into a gimbal). This is a perfect head for Nebraska if you are using a 600mm f4.
The Fotopro E-6H Gimbal head is another excellent option for all lens types. It’s also a very versatile head if you record video in addition to stills. It has a lot of nice features for both formats and is relatively small to pack. I am a dealer for Fotopro as well and can offer my audience a special discount. Please call or email me for details. $529.00
Another great option is the Panoramic Head from Acratech. It is a much smaller and lighter head, but still capable of holding a 600mm f/4. Its smaller size makes it easy to pack and it has good measurement markings, so I use it a lot on landscape trips and as a wildlife back-up for the larger heads above. I am also a dealer for Acratech, so please contact me to purchase. $479.95
Luggage & Packing Cubes
It is much easier to use a duffel bag for your checked luggage to Antarctica. First, there is not much storage space for luggage in the cabins, so I unpack my bag and use the closet and drawers. I can then fold up the duffel bag or stuff it under the bed (depending on cabin type). The duffel bags also usually only weighs a few pounds which doesn’t use up much of the weight limit. Most airports have carts for your use, but in a pinch, I choose duffel bags that also have hidden emergency backpack straps. I’m listing a couple good options below if you don’t already have something that will work.
Osprey Daylite 115L Wheeled Duffel is one of the best options.
The Eagle Creek Migrate Duffel Bag 130L is also excellent, but only has wheels without a telescoping handle.
I use packing cubes inside for all of my clothes and other items. It helps keep everything together and more compressed for travel. Any lightweight packing cubes will work well to keep you organized. I prefer compression packing cubes to maximize space.
If you want a more traditional type suitcase, but something that still packs down to a smaller size on the ship, this Full Size Checked Roller Bag is a great option as soon as it is back in stock. It is also best to use Packing Cubes with this suitcase.
Image Storage & Backup
I use Sandisk for my image storage and back-up.
I try to buy fast cards (which are more expensive), but can make a difference if you have a high end body and are shooting at fast frame rates. It is also very helpful to have a fast card if you are going to shoot video. I usually buy 256GB cards (The number of Gigabytes determines how many images the card can store, which varies from camera to camera depending on the megapixel count, RAW/jpeg settings etc).
My camera, the Canon R5, uses SD Memory Cards and CFExpress Cards, but you will have to check your own camera body to find the right type of card. Many DSLR’s take Compact Flash Memory Cards. The fastest SD cards available are 300 MB/s. CFExpress Cards are typically much faster at 1200 to 1750 MB/s. Keep in mind the camera has to be able to write at those speeds to take advantage of the faster cards, so if you have an older, slower camera, you may be fine buying the slower, cheaper cards.
The number of memory cards you should take really depends on your own personal shooting style and how many good opportunities you end up having on the trip. I personally put both a 256GB CFExpress Card and a 256GB SD Memory Card in each camera body. Then I carry a card case with two additional 256GB CFExpress Cards and four 256GB SD Memory Cards. This is usually more than enough to get through a trip. If you are extremely heavy on the shutter, you may want to take an extra case with a few more.
I use the following card readers for travel:
I also use Sandisk external drives for the backup of my images. I always make 3 sets of backups and keep each in a different location during the trip.
- If you take enough cards and don’t erase them, that can serve as one backup.
- The hard drive of your laptop can also serve as a backup
- Personally, I take 3 portable drives and one drive is in a pocket with me at all times.
I use Sandisk Extreme Pro Portable SSD Drives or the older generation Sandisk Extreme Portable SSD (a bit less expensive) that are very small and easy to carry. They come in 1TB, 2TB, or 4TB capacities. I would get the largest size you can afford as it’s easy to take A LOT of photos on this trip. SSD (Solid State Drives) are the best choice because they don’t have any moving internal parts (other drives spin). This makes them more durable and not susceptible to magnet damage either.
At home, I use larger capacity spinning drives to store and back-up my images. I use a RAID (redundant array of independent disks) so that I can make two copies of the images at the same time (called mirroring). Most drives have to be configured in order to mirror, so be sure to read the instructions carefully when your drive arrives. I use a 40TB G-RAID drive, but they come in smaller capacities as well. Keep in mind if you are mirroring, that you will have half of the listed space (i.e. 40TB = 20TB when mirroring).
computer equipment & Software
I do recommend taking a laptop Computer on the trip. I think it is important to be able to at least look at your images to check for sharpness and make sure everything is working properly. This could also be done on a tablet. A laptop will be a better choice if you want to do a lot of editing or work on processing techniques. On sailing days we will have time to work on the computer.
It’s also important to make sure you have the software you want loaded onto the computer. I’ll provide affiliate links below to the software I use so that if you want to purchase it before the trip, you can.
Adobe
My primary image processing software is Adobe Photoshop. It’s a very powerful program that is really the industry standard. They have a very reasonable subscription package for photographers that you can find through my affiliate link below.
Topaz Labs
I use Topaz Labs software a lot. They have several options and they are all excellent. I primarily use the individual legacy programs that are no longer available as I feel I have more control. If you are having trouble with noise reduction and sharpening, I do offer processing services by the hour.
Topaz offers a variety of AI driven software to help improve your images. Any software results are very image dependent and require some experimentation, but Topaz offers a lot of great tools to perfect and enhance your images. The new Topaz Studio Subscription app is the best comprehensive option for still photography.
Skylum
Skylum also makes very useful software. I’ve been using it for years and they’ve added a lot of new features and AI.
Luminar Neo has lots of fun features like sun rays, sky replacement, background removal, focus stacking, HDR etc.
DxO Software
I’ve been using the Nik Collection plug-in filters for many years as well. The Collection includes 8 different filters for a range of creative effects including HDR, B&W Conversion, Color enhancement, local adjustments, perspective control and much more. The software is easy to use and is an essential complement to the other software programs in my tool kit.
I use the Nik Collection a lot on snow covered scenes, so this would be a great purchase if you don’t already have it.
Please just click on the image to follow my affiliate link.
New customers can get a discount with my code: Opperman
ON1 Photo RAW MAX
ON1 Photo RAW MAX is a full featured program but well worth the purchase price as I have found some of the features to perform better on some images. Follow this link to purchase the entire suite including the plug-ins.
I particularly like Resize (which can also be purchased as a standalone) and it’s always good to have multiple options for taking out noise. If you only want to purchase plug-ins, follow the link below:

Lens cleaning supplies
Your lens can get dusty or wet if you don’t have it covered while walking on shore. While dust or water on the lens will not show up as distinct spots in your image, a large amount of dust or water on the lens can soften the image much like a diffusion filter and can also cause problems with the autofocus. It’s best to keep the lens as clean as possible for optimal performance and image quality.
If it is just loose dust, an air blower works well. It’s best not to touch the lens surface any more than necessary, but a soft brush also works well for dust. For fingerprints, water drops, or larger smudges, a microfiber cloth works well. And then, if all else fails, using a liquid cleaner (that you spay on the cloth, NOT directly on the lens) is helpful. Zeiss makes a great kit that includes many of the items in one compact set, or you can just buy the cleaner. Optical is also a great liquid cleaner.
PORTABLE STOOL & GROUND PADS
They do not want anyone to lie on the ground to take pictures, so if you do want to get a lower angle, taking a portable stool is a good option. I use a Swivel Folding Stool that is very lightweight and portable. This Collapsable Portable Stool is also a good choice.
It can be helpful to use walking sticks on shore. Traditional walking sticks work fine, but I’ve started using a portable walking stick with a built in chair, but it is too long to be packed in luggage, so it has to be carried on the plane.
Knee Pads or Gardening Pads can also be helpful if you are going to kneel instead. Just keep in mind that anything you bring you will have to carry.
Please keep in mind that we have to clean anything that touches the ground so that we do not transport invasive species or biological material from one site to another. Anything you can bring that minimizes your contact with the ground and is easy to wash off will make this process much easier.
Laundry
There will be laundry service on board, but it can get expensive, so I usually hand wash smaller items in the sink.
EarthBreeze Laundry Detergent Sheets
Earthbreeze makes environmentally friendly laundry sheets that I use at home as well. It’s basically compressed soap that does not require plastic bottles. It lathers up extremely well and is easy to carry in a ziplock bag to use in a washing machine or in the sink for hand washing clothes. It does not take up much space and you can cut the sheets into smaller sizes when only washing one or two items at a time.
Travel Laundry Line
I’ve been traveling with this simple travel laundry line for years and it works very well for small items like underwear, plus it is easy to pack.
CLOTHING AND SHOES
Please don’t feel like you need to go out to buy a new wardrobe for this trip, but I am often asked what I wear to stay warm, so I’m providing the following section.
Coats
LL Bean Jacket
My favorite heavy winter jacket is made by LL Bean and can only be purchased for the winter season (it usually shows up on their website in late September and is sold out by spring). They only make a men’s version, but the small fits me just fine. It has a lot of great pockets that can be used for accessories (batteries, filters etc) and can even hold a camera body or small lens if necessary. They give you 10% off your first order if you sign up for their mailing list. Men’s Maine Warden’s 3-in-1 Parka, with Gore-Tex
Make sure whatever jacket you bring will perform well in wet conditions (snow and rain) or bring a poncho so you can cover it if necessary.
Venture Heat
Under my heavy winter jacket, I like to use battery heated clothing. I’ve had very good luck with the Venture Heat down filled or puffer jacket. A heated jacket or vest is well worth the money if you do not own one. I can just turn it on and off as needed and it does a great job. I find I don’t need a lot of heavy layers under this combo to stay warm. It is a good idea to buy extra batteries.
15% off most items year round (if the code does not work, please email me): OPPERMAN15
Waterproof Pants
You will also need a good pair of waterproof rain or snow pants. It is likely your pants at some point will get splashed in the zodiac or as you step out to shore, so this choice is really important. These you might need to try on over your other layers, so if you need something new, I would suggest going to your local sporting goods store. One way to help prevent water from going into your boots in case you jump out of the zodiac too fast into deeper water, is to cinch them around the boot with a strap. These straps available on Amazon work well.
If you can’t find anything you like locally, this pair of High Waisted Waders would be a good option.
Gloves
Keeping your hands warm while still being able to operate the camera buttons can be challenging. I have found solutions that work pretty well, but nothing is perfect. Sometimes I just have to take a break and warm up my fingers with the hand warmers. It is a good idea to bring 2 sets of gloves, just in case one pair gets wet and needs time to dry out. I’ll share what I use below. As an Amazon Associate and Cabela’s affiliate, I earn from qualifying purchases through my links.
OVER GLOVES
For an over glove, I use Cabela’s Gloves (to be used in combination with glove liners – men’s, but they work fine for women too!) I’ve been using these for years and they work really well for me.
You may also want to take a pair of neoprene gloves for the ride in the zodiac over to the shore and pack your other gloves in the waterproof bag so they do not get wet. Fishing Gloves can work well for this purpose. Water splashing on my gloves has not been a big problem, but if you want to be extra careful these are an option. These are also a good option for days when it is raining or snowing.
GLOVE LINERS
I like open finger liners like these convertible finger gloves. The fabric is thin, but I can also expose the fingers I need for focusing and the shutter release if it is warm enough outside. The key to using thin glove liners is to have a good over glove!
Boots
We might walk up to a mile each way on uneven terrain in all types of weather, so be sure to wear comfortable boots. We have to clean everything that touches the ground, so it’s a good idea to have boots that also wash off easily. The ship will provide rubber boots, but I prefer to pack my own so I know they fit well.
I recommend these Women’s Boots and these Men’s Boots with Interchangeable Soles (make sure the sole size matches your boot size).
Make sure you bring comfortable and warm socks as well. I use thick wool socks.
A pair of sandals and/or room slippers may be nice to have as well for walking around inside as we leave our dirty boots in a mud room. I also always wear shower shoes.
Micro Spikes
In case there are icy conditions, I take a pair of micro spikes. These are my favorite spikes because they are so easy to put on and take off. Just make sure you buy the largest size so they will fit over the boots. If you buy the boots above, you can just buy a sole with spikes instead.
Hand and Foot Warmers
My hands and feet get cold easily, so I take along warmers. For my hands, I am now using mostly rechargeable hand warmers that take up less space and are less waistful. These must be put in hand luggage as they contain a battery. I can’t find the exact brand I have anymore, but here are some Handwarmer options. Be sure to look for a 5 star rating. You can always use the traditional disposable hand warmers as well. I like the MEGA Warmers as they are bigger in size than traditional hand warmers.
I put the warmers inside this hand warmer muff which makes it easy to warm up my fingers when needed.
To keep my feet warm, I still use the air activated disposable kind that can be found here. I pack two pairs for every day and that usually gives me plenty.
ELECTRICITY & POWER STRIP
Worldwide Travel Plug Adapter
You will need to have a plug adapter so that you can plug in your US devices and charge your batteries etc. I use a universal adapter so that it has every plug type you might encounter. When you are traveling to multiple countries that might have different plug types, it gives you everything you need in one compact accessory. I can’t find the exact brand I have, but this Worldwide Travel Plug Adapter is rated well. I recommending bringing Two of these. Also, be sure to check that the devices you plan to use are dual voltage (100-240 volt) as this is not a power converter. Most laptop computers, phones, and camera chargers are dual voltage, but check your manual to be sure.
Power Strip
It is a good idea to have a Travel Power Strip with extra plugs in case there are not enough outlets in your room to power all of your devices.
Plane Pillow
I have a terrible time sleeping sitting up in a plane, but I’ve starting traveling with this unique Travel Pillow that sits on top of the tray table and it has helped tremendously. It looks a little silly, but it works for me and is much better than leaning against the window. I use a tiny Battery Powered Air Pump to blow it up, but you can use your breath too.
Earplugs for sleep
If you are in a shared room and do not know your roommate, you might also want to consider taking some earplugs just in case they snore. You can always get the foam kind at your local drug store, but I like to take Smart Sleep Earbuds that are noise blocking with soothing sounds (ocean waves, chirping birds, white noise etc).
Watch with fitness tracker
Whenever I travel, I try not to wear anything that is or looks expensive. I leave jewelry at home except for a cheap watch. The best option I have found is only around $50! It’s not big or bulky, but it does the job and has lots of great features including world clocks that can be programed for your destinations through an app on your cell phone. Best of all, the battery actually last for days – you read that correctly – DAYS! No more charging every single night (which is a real pain when traveling). This amazing Amazfit device can be ordered here. The only thing I don’t like is the band which can come apart easily if it catches on something.
They have a more expensive version (that I have not tried) with what looks like a more secure band that may be worth considering: Amazfit Smart Watch.
Be sure to check phone compatibility before ordering. (As an Amazon Associate I earn from qualifying purchases through my links)
Toiletries & Personal Hygiene
In addition to basic toiletries, such as toothpaste, floss, deodorant etc, you may want to bring along some of the following items:
Shampoo, conditioner and body wash may be provided, but I always bring some of my own. I also either bring refillable bottles that I will take back home or products with compostable packaging so I am sure not to contribute plastic waste to the continent. Some options to consider are linked below:
There are no restrooms on shore, so they do ask that you go back to the ship when nature calls. In an emergency you could use a Waist Bag. I’ve used these before when photographing from blinds and they do work well in a pinch.
You might also want to take along some Travel toilet paper which can be stored in a ziplock bag or they also fit perfectly in this small water bottle. There are also really good Pocket Kits that give you lots of supplies (seat covers, wipes etc) for use in public restrooms in the airports.
Having a way to clean and sanitize your hands will be necessary. Some of the products I use are listed below:
- Spray hand sanitizer
- Compressed towel tablets (instead of wet wipes to reduce packaging waste – just add water or spray with sanitizer)
- I also take a Micro Trash Container to store used tissues or wipes. This mini expandable trash container works well too.
- You can take some disposable wipes and hand sanitizing wipes as well just in case we don’t have extra water.
I also take Travel size Kleenex or Bamboo travel size tissues that are better for the environment (but more expensive).
Compressed hand towels, bath towels or washcloths and a camp towel can be nice to have if you want an extra towel or two. I just remove the plastic from the compressed towels before leaving home and store them in a ziplock bag.
If you have long hair, you may want to bring hair ties to prevent hair blowing in your face.
Women’s Only items
This section is only for the ladies. I found great underwear that can be used instead of pantyliners, pads, or bladder control products. It is on the expensive side, but more environmentally friendly, easy to hand wash, and more convienent than the disposable products. They can also be used with a disposable product for an extra layer of protection, which is especially nice when traveling. Speax is for bladder leaks and Thinx is for that time of the month. Click on the product you want on the top left of the site. There are many different styles from which to choose.
You will get $10 off if you order through my link.
If you prefer pads, but want something more environmentally friendly, these cotton reusable pads are comfortable and better for sensitive skin.
I also found a great supportive bra after pulling a muscle and it has improved my posture and well as reduced my back pain. It is on the expensive side, but well worth the investment in my opinion. I chose the Revive Bra, but there are several different styles. They can be a little challenging to get on and off if you are on the busty side, so be sure to order up for adequate space.
Click on this link to get a discount off your first order.